Showing posts with label free project. Show all posts

January 2, 2012

Pin-spiration from Beverly's!

Happy New Year, readers! We hope you all had a wonderful holiday season and are ready to make 2012 the best year yet.

The team at Beverly's is always looking for fresh ideas, new inspirations, and great projects. Finally, we have a place to share all those ideas, amongst ourselves and with YOU, thanks to our new boards on Pinterest!

Beverly's Pinterest Page

Have you checked Pinterest out yet? It's a great site that allows you to create virtual pinboards of all the amazing things you find on the internet.

Beverly's Fabric Pinboard on Pinterest

The appealing visual display and ability to organize according to your own style make this a beautiful, useful and fun site!


Beverly's Pinned Item on Pinterest


But one of the best things about Pinterest is that, when you "pin" a photo, it doesn't just save the picture, but the link back to the site you found it on. How many times have you wished you could find that great recipe, that cool crafting how-to, or that perfect little black dress that you saw last week? Pinterest will help you with all of that!


You can follow the boards of all your creative friends, your favorite stores, and even creative people that you don't know, but wish you did. And we hope that, now that you know about Pinterest, you'll follow Beverly's as well! Happy pinning!

tag: allstores

December 24, 2011

Day 12 - Hot Cocoa Cones

12 Days of Christmas Header

On the twelvth day of Christmas, my crafty friend gave to me....
Hot Cocoa Cones!

Who doesn't love a cup of hot cocoa on Christmas morning? I know I do! This quick and easy stocking stuffer includes some yummy extras that make that cup of cocoa special...marshmallows and peppermint!

 Download the free instructions, and while you're making them, don't forget Santa! I'll bet he'd love the gift of a Hot Cocoa Cone along with his milk and cookies tonight.


tag: allstores

December 23, 2011

Day 11 - No Sew Fleece Scarf

12 Days of Christmas Header

On the eleventh day of Christmas, my crafty friend gave to me....
No Sew Fleece Scarf!

We are getting down to the wire! Christmas will be here in two days, but undoubtedly, there is someone you've forgotten on your list. Well, what could be easier than cutting a strip of fleece, fringing the edges and adding a few beads? The answer is nothing. Nothing could be easier. But nothing doesn't make a warm, toasty gift, either. So c'mon...get crafty, readers!

 Download the free instructions and whip up a couple of these winter warmers tonight. Then sit back and enjoy all the compliments you'll get!


tag: allstores

December 21, 2011

Day 9 - Tell Your Story Jewelry

12 Days of Christmas Header

On the ninth day of Christmas, my crafty friend gave to me....
Tell Your Story Jewelry!

We all have one. That person on your gift list who has everything. Well, here's a gift that is unique, personal, and easy to make! Using a combination of charms and roundel beads, you can capture that special someone's personality just in time for the holidays.

Download the free instructions for the bracelet or a necklace for a truly personal gift!


tag: allstores

December 20, 2011

Day 8 - Holiday Tea Towels

12 Days of Christmas Header

On the eighth day of Christmas, my crafty friend gave to me....
Holiday Tea Towels!

At my house, friends stop by with holiday goodies and tasty treats the week before Christmas. I'm not a baker, so I like to keep a few of these simple, festive tea towels handy. My friends love them, since they're as pretty as a plate of cookies, but with no calories!

 Download the free instructions so you'll be prepared for those last minute drop-in guests!


tag: allstores

December 19, 2011

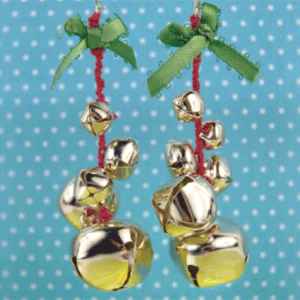
Day 7 - Jingle Bell Earrings

12 Days of Christmas Header

On the seventh day of Christmas, my crafty friend gave to me....
Jingle Bell Earrings!

Everyone will know that Santa's on his way when they hear these "sleigh bells" jingling! Fun, festive and easy to make, these jingle bell earrings will put anyone in the holiday spirit.

 Download the free instructions and add some jingle to someone's holiday!

tag: allstores

December 15, 2011

Day 3 - Holiday Cupcake Tower


On the third day of Christmas, my crafty friend gave to me...

This project makes me hungry just looking at it! It's so simple to create this holiday cupcake tower using square glass plates and vases. One of the great things about it is that you can use it for other events by changing the trim and the filler. And since gluing the pieces together is optional, you can unassemble it after your event and store it neatly away.

 Download the free instructions for a great addition to your holiday dessert table!

tag: allstores

December 14, 2011

Day 2 - No Sew Fleece Blanket


On the second day of Christmas, my crafty friend gave to me....


No Sew Fleece Blanket!


Polar fleece, some scissors, a ruler and a great holiday classic movie. That's all you need to whip up this winter warmer for someone special on your gift list! You don't really need the movie, but it's a great excuse to sit down for a couple of hours during this busy season.

This year, I made one for my daughter with her two favorite football (yes, football) teams. But don't tell her...it's meant to be a surprise! Download the free instructions and get cozy!

tag: allstores

September 21, 2011

Vintage Lace Scarf

Vintage Lace Scarf
Our in-store Social Crafting event this evening was a big success, and everyone had fun creating this vintage lace scarf! It will be a perfect accessory this fall. The lace adds a touch of nostalgia, while the twisted fabric and ribbon flowers give the scarf some whimsy. Since the project was such a hit with those who attended, we wanted to share it with you as well.

Read on for step by step instructions or download the Vintage Lace Scarf project from our website.

Materials:
  • White Lace, 2 pieces - 9” x 80” and 9” x 36”
  • Strong brewed tea in small plastic cup (Save the teabag…you will need it!)
  • Sponge brush (optional)
  • 7/8” Grosgrain Ribbon, 3 coordinating prints
  • Fabric Strips, 2”x20”, 2 coordinating prints
  • Rhinestones
  • Fabri-Tac Glue
  • Scissors
To Make:

Tea Bag for Tea Dying


Brew tea in small plastic cup. Allow to cool.
Tea Dyed Lace
Fold fabric into double layer. Use teabag to tea dye by dabbing bag directly onto fabric (be sure you are working on a protected surface). Dip teabag back in tea to re-saturate as needed. If teabag is not useable, a sponge brush can be substituted. Flip fabric and dye the opposite side.


Fringing Lace


Use scissors to cut fringe about 5" deep on each end of one piece of lace.


Fabri-Tac Glue and Lace

Cut second piece of lace into 6”x9” pieces. Layer and cut fringe on all pieces about 5” deep. Adhere 3 layers of fringed lace over each fringed end of scarf. Fold long sides to center back and glue for a narrow end. Repeat for other end of scarf. Your ends will be approximately 4- ½” wide.


Back of Scarf


Cut a piece of ribbon about 10” long. Adhere over raw edges at top of lace, wrapping around back and folding top raw edge under. Repeat for other end of scarf.


Create twisted fabric and ribbon flowers and adhere as desired on one end of scarf. For the ribbon flowers, you may use the directions below, or watch a video tutorial on making twisted fabric flowers.
Twisted Fabric & Ribbon Flowers
Materials:
  • 1-1/2” cotton fabric strip (torn), or piece of ribbon
  • 2” felt circle
  • Rhinestone or button(optional)
  • Hot glue

  • To make:
    Glue fabric strip or ribbon to outer edge of circle.
    Pleat and glue around, working your way to the center.
    Glue rhinestone or button to center front.
    Vintage Lace Scarf
    Your scarf is complete. Go forth and be stylish!


    tag: allstores

    August 25, 2011

    Accordion Envelope Book

    Envelope Accordion Album PhotoThis week, Beverly's stores hosted an evening of Social Crafting, featuring this cute accordion envelope book. The participants had so much fun creating this project that we decided to share it with you here!

    Created with basic envelopes, the book is then embellished with scrapbook paper (we used Funhouse from GCD), ribbons, flowers and bling.
    Imagine the embellishment possibilites! With Christmas paper, it becomes a place to store your lists, budget and receipts. Covered with a cute kitchen print, it will hold your shopping list and coupons for the grocery store!
    Read on for step by step instructions, or download the project here.


    Supplies Needed:

    5 Envelopes (we used 5 ¼” x 7 ¼”, but other sizes work)
    4 5”x7” Greeting Cards (paper measures 10”x7”)
    3 Sheets Double Sided, Patterned Scrapbook Paper
    (or 6 Sheets Single Sided Patterned Paper)
    6 Sheets Solid Cardstock to Coordinate with Patterned Paper
    Ribbon
    Envelope Accordion Book PhotoRibbon-Slot Edge Punch
    Decorative Edge Punch
    Rat Tail Cord
    Paper Clips
    Small Silk Flowers
    TinyType Alphabet Stickers
    Rhinestones, Buttons for Embellishment
    Distress Ink
    Adhesive of Choice
    Craft Knife, Scissors
     
    To Make the Base Book:

    Accordion Album Step 1 PhotoCreate accordion book from five envelopes. Using a glue stick, adhere the envelopes together by placing adhesive on the inside of the flap of one envelope attaching it to the front of the next envelope. Repeat for all five envelopes.


    Accordion Album Step 1a Photo

    Fold the pages accordion style, making the flap of the first envelope the cover of your book.


    Accordion Album Step 2 Photo


    Add a ribbon closure. Cut a small opening the width of the ribbon on both sides of the last envelope and run the ribbon through (page shown already decorated).


    To Make the Cover:

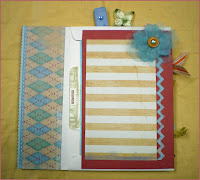
    Cut two pieces of decorative scrapbook paper measuring 2”x7 ¼”. Adhere to front and back of first envelope flap, using the adhesive of your choice.
    Accordion Album Step 3 Photo
    Page 1:
    Adhere 4 ½” x 7” piece of solid cardstock to envelope pouch, as pictured.
    Top with edge punched 4”x6” piece of patterned paper.
    Embellish with silk flower, button and rhinestone.
    Pocket insert will be created later in this tutorial.

    Page 2:

    Accordion Album Step 5 Photo
    Adhere 4 ½” x 7” piece of decorative paper to envelope pouch, as pictured. 
    Top with 4”x6” piece of solid cardstock. Use pieces of coordinating paper to embellish.
    Use Tiny Type stickers to spell out “LOOK HERE” on inside of pouch edge.
    Pocket insert will be created later in this tutorial.


    Accordion Album Step 6 Photo


    Page 3:
    Edge punch 4 ½” x 7” piece of solid cardstock with ribbon slot punch.
    Weave  ribbon through slots as pictured, skipping one slot on the top as you weave. Tape ends on back of paper. 
    Adhere to envelope pouch, as pictured. 
    Top with 4”x6” piece of patterned paper.
    Pocket insert will be created later in this tutorial.

     
    Page 4:

    Accordion Album Step 8 Photo
    Edge punch 4 ½” x 7” piece of solid cardstock with ribbon slot punch. 
    Tie two 4” pieces of in a knot. Weave  the ends from the center through slots as pictured, skipping three slots each time you weave. Tape ends on back of paper. 
    Adhere to envelope pouch, as pictured.
    Top with two piece of patterned paper, measuring 2 ½” square and 2 ¾”x 3 ½”, respectively.
    Embellish with decorative paper and rhinestones.
    Pocket insert will be created later in this tutorial.

     Page 5:
    Accordion Album Step 9 Photo
    Adhere 4 ½” x 7” piece of decorative paper to envelope pouch, as pictured.  
    Top with 4”x6” piece of solid cardstock. Use pieces of coordinating paper to embellish.

    Use rhinestones and buttons to embellish as desired. 
    Pocket insert will be created later in this tutorial.


    Back Cover:

    Accordion Album Step 10 Photo
    Adhere a 5 ¼”x7 ¼” piece of decorative cardstock to front side of last envelope, as pictured (this is the opposite side of the book than you have been working on.


    Decorative Paper Clips:
    Accordion Album Paperclips
    Use a strong adhesive to adhere scraps of paper or silk flowers to the tops of paper clips. Embellish as desired.


    Accordion Album Step 11 Photo
    File Folder Insert:
    Make tab on one 7” side by cutting ½”x2” notches on both sides. Use corner rounder to round tab.
    Distress tab with distress ink.
    Adhere Tiny Type letters to spell “MEMORIES.”


    Accordion Album Step 12b Photo
    Make folder from back of card by folding back of card to inside in at 2 ½” inches. 
    Cover card under tab with patterned cardstock, 4”x7”. Add strip of solid cardstock under tab.
    Cut three pieces of patterned cardstock, 1 ½” x 7”, 2”x7”, 2 1/2” x 7” and adhere to flaps of folder as shown.


    Accorion Album Step 13a Photo
    Mini Book Insert:
    Cut 4”x7” piece of double sided cardstock. Fold in half.
    Cut greeting card into two pieces measuring 3 ½”x6”. Fold in half. Align in center of folded double sided cardstock. 
    Punch two holes along fold lines through all layers. Run rat tail through and tie in a bow on the outside.
    Embellish cover as desired. 


    Accordion Album Step 14 Photo
    Gatefold Insert:
    Cut greeting card down to 5” height.
    Open card. Fold front to center and back to center to create gate fold. 
    Cut two 2 ½”x3” pieces of decorative paper. Adhere to front flaps.
    Use Tiny Type stickers to spell out “SWEET SMILES” on front flaps.
    Use paper scrap embellishment to make gatefold “latch.”


    Accordion Album Step 14b Photo
    Adhere 4 ½” square of decorative paper to inside of card. 


    Accordion Album Step 15 Photo
    Tag Inserts:
    Cut two pieces of solid cardstock, 2 ½” x 4 ½”. Cut corners from one end to form tag shape. 
    Distress with distressing ink.
    Embellish with ½” strips of decorative paper. 
    Punch hole at notched end and embellish with ribbon.


    Accordion Album Step 16a Photo
    Pocket Card Insert:
    Cut the front of greeting card to 3”. Embellish with two 2 ½” squares of decorative paper, and a strip of decorativepaper in the middle.
    Create pocket on inside of card. 
    Cut decorative paper to 3”x5”. Apply adhesive to two short sides and bottom long side and adhere to inside of card to make pocket.
    Cut a piece of decorative paper 3 ½” x 6”. Notch corners on one short side to make tag shape. Punch hole and embellish with ribbon.


    Place all inserts in pouches and attach clips at top. Accordion fold shut and tie closed with ribbon. Enjoy!